
Breads (Sourdough) - Soft Loaves
Soft Spelt Sourdough Bread (Yudane Method)
June 03, 2019
| Recipe by Bake with Paws
Updated: March 2023
By Bake with Paws


If you're looking for a wholesome, soft, and mildly tangy sourdough loaf, this Soft Spelt Sourdough Bread may become your new favorite. Made with a combination of spelt and bread flour, and enriched with the Yudane method, this bread offers a tender crumb, lovely structure, and improved shelf life—all naturally leavened with a sourdough starter.
Why Use Spelt?
Spelt is an ancient grain with a mild, slightly nutty flavor. It’s a great alternative to wheat flour, offering a good balance between nutrition and baking performance. However, spelt flour can be tricky to work with—it’s lower in gluten than bread flour and can result in a denser texture if not handled carefully.
In this recipe, I’ve combined spelt flour with high-protein bread flour to achieve a soft, light texture while still showcasing the distinct taste and nutritional benefits of spelt.
The Yudane Method for Softer Bread
Yudane is a Japanese technique where a portion of flour is scalded with boiling water before being incorporated into the dough. This gelatinizes the starches, leading to better moisture retention, a softer crumb, and a longer-lasting loaf.
In this sourdough version, the Yudane method works beautifully to soften the spelt and counterbalance its tendency to produce denser loaves. Please refer to "BREAD MAKING METHODS" if you like to understand more about Yudane Method.

Recipe Highlights
Hydration: ~58.3%
Flour blend: 65% spelt, 35% bread flour
Natural leavening: 100% sourdough starter
Method: Yudane, cold retard
Crumb: Soft and moist
Shelf life: 2–3 days at room temperature still fresh and soft; freezes well
If you have any questions regarding this recipe or any other post, please leave me a comment in the “LEAVE A COMMENT” link and I will reply you as soon as possible. Do tag me on Instagram @Bakewithpaws if you attempt on this recipe.
How To Make Spelt Soft Sourdough Bread
Ingredietns (Yields: 1 loaf)
Yudane Dough:
65g bread flour (I used Japan High Gluten Flour)
60g boiling water
Sweet Stiff Starter:
50g sourdough starter (100% Hydration), preferably use at its peak
90g bread flour (I used Japan High Gluten Flour)
60g spelt flour
62.5g water
25g sugar (I used organic brown sugar)
Main Dough:
90g spelt flour
All sweet stiff starter (above)
All yudane dough
15g brown sugar (I used organic brown sugar)
1 tsp (5g) salt
45g egg, whisked (reserve 10g and add in the balance if the dough is dry), I used all 45g
30g butter, room temperature
Egg Wash:
1 egg + 1 Tbsp water, whisked
Utensil:
450g loaf pan (21.3 X 12.2 X 11.5 cm / 8.4" X 4.8" X 4.5")
Note:
I did not add more water/milk in the main dough as spelt flour absorbs less liquid compared with wheat flour.
Step-by-Step Instructions:
1. Yudane:
- Add bread flour in a bowl, pour the boiling water and mix well with spatula or spoon until no dry flour.
- Cling film and leave on the counter for at least 4 hours or overnight in the fridge. I prepared the night before.
- Take out from the fridge 30 minutes before using to return to room temperature.

2. Sweet Stiff Starter
- Hand mix -
- In a bowl, dilute starter and sugar with water, mix in flours to become a dough. Transfer to a clear jar and cover.
- Machine Mix -
- In a bowl of stand mixer, dilute starter and sugar with water, then add in bread flour. Mix with paddle attachment until well mixed and all come together. Cover.
- Let it ferment until tripled. I prepared a night before and leave it in aircond room (approximately 24 - 25C room temperature) overnight until tripled. It took about 8 - 9 hours depending on your starter. It should take around 4 - 6 hours to get triple at room temperature at 28C - 30C.

- Put all ingredients (except butter) into a bowl of stand mixer. I usually torn the stiff starter and yudane dough slightly first.
- Slightly combine the mixture by hand with the paddle attachment before turning on the machine so that the flour will not splash out. Using the paddle attachment, mix for about a minute or until all incorporated. This step is critical to prevent an uneven mixed dough as the stiff starter is rather hard and a dough hook may not be able to mix it well enough.
- Change to hook attachment and knead for another 2 -3 minutes at low speed #2 (KA) or until the dough comes together. Add in butter and continue knead for about 8 - 10 minutes at low speed #2 or until reach window pane stage. The whole kneading process, I stopped few times to scrape down the dough from the hook to be sure it is evenly kneaded and also to prevent the motor from overheating.
- Please take note that spelt dough is more extensible, soft and sticky. It requires less kneading time to achieve window pane stage too. Spelt has a more delicate gluten structure that may be easily damaged if over kneaded.
- In the same bowl, let the dough rest for 45 - 60 minutes. Keep it covered with clingfilm or use a lid. This dough I rested for 1 hour at 28 - 29C room temperature and the dough rose slightly.
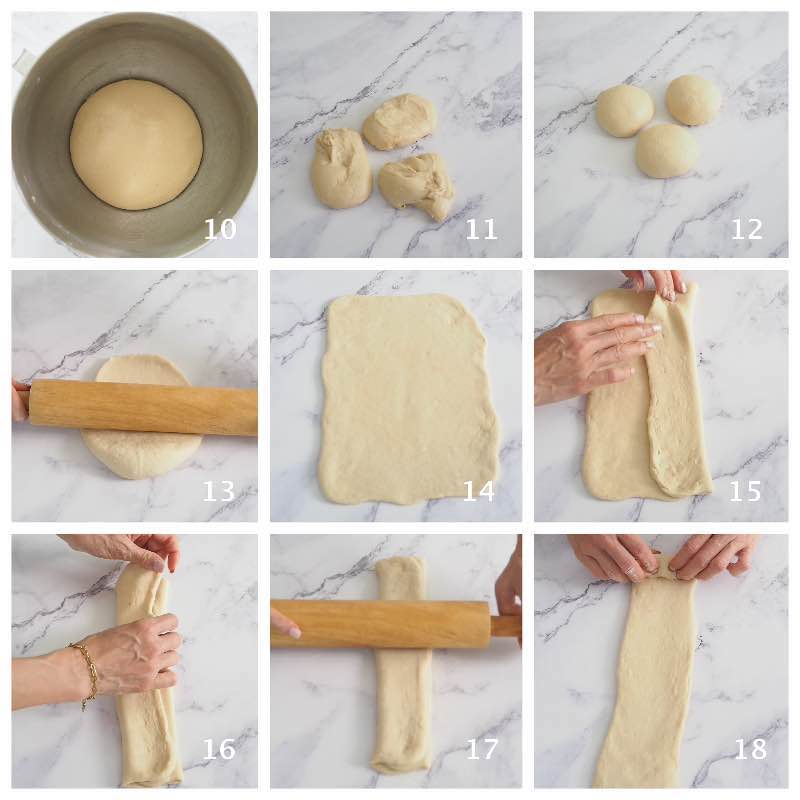
- Transfer the dough to a clean floured surface then divide into 2 or 3 equal portions. Please use a kitchen scale if you want to be exact.
- Form each portion to a ball. Flatten with rolling pin.
- Fold right to centre and fold left overlap it. Roll out with rolling pin into long rectangle shape. Roll up the dough like Swiss Roll until a small log is formed.
- Place all dough in the prepared loaf pan.
- Let it proof in a warm place until the dough reaches about 0.5cm - 1 cm below the height of the pan. This one took approximately 3 1/2 hours at room temperature of 30C. The duration of proofing depends on your ambient temperature and starter.
- Preheat oven at 180C -190C (top & bottom heat) or 170C (fan-forced) for 10 - 15 minutes.
- Brush with egg wash (optional) and bake in a preheated oven for about 25 minutes, or until golden brown. You may cover the bread with aluminium foil for the last 10 minutes if the top browning too quickly.
- Remove bread from oven and let them cool on rack completely before slicing.


Tips for Perfect Results
- Sourdough Starter:
- A healthy starter is essential for successful bread baking. To ensure your bread rises well, it's important to feed your starter regularly and use it (the levain) at its peak. A consistently fed starter will be more active and reliable. If the mother starter isn’t strong, the dough may still struggle to rise properly, even if the levain is used at its peak. For more information, click the links: "How To Make Sourdough Starter" and "Sourdough Maintenance".
- Gluten Development:
- Essential for soft, airy bread, gluten is created when flour hydrates. To develop it, use techniques like autolyse or kneading. The windowpane test checks readiness—dough should stretch thin without tearing. From my experience, high hydration dough with high percentage of fat will be easy to stretch and achieve a paper thin windowpane stage.
- Kneading:
- Please regard the timing provided as an indication only. It is only meant as a guide. Times vary by flour and mixer type. For higher fat dough, knead longer (18–20 minutes).
- Flour & Hydration:
- Use high-gluten flour for optimal texture. Always reserve some liquid to adjust dough consistency for best results. If dough is too dry, add the reserve liquid one tablespoon at a time until the right consistency.
- Dough Temperature:
- Maintaining the right dough temperature during kneading is crucial for a fine crumb. If the dough becomes too warm, the crumb will become too big and uneven. To prevent this, use cold water, milk, or eggs, and chill your mixing bowl or hook attachment in the freezer. Knead at low speeds, and if your kitchen is warm, rest the dough in a cooler spot. Proper dough temperature ensures a soft, fluffy bread with a fine, even crumb.
- Proofing:
- Proofing time depends on your environment. Use the finger poke test to gauge readiness. To check dough readiness, lightly press the side with your finger:
- If it bounces back instantly, it’s under-proofed and needs more time.
- If the indentation stays, it’s over-proofed.
- If the indentation slowly bounces back, it’s ready to bake.
- There’s also a final rise called oven spring when the dough bakes, which adds to the bread’s height.
- Wrinkle Top or Shrinking:
- If your bread collapses or develops wrinkles on top after baking, it might be over-proofed during the second rise. Aim for the dough to rise to 80-90% of its final size or just below the rim of the pan to prevent this. Over-proofing leads to weaker structure, causing the bread to lose shape.
- Baking & Oven Temperarate:
- Do also note that the baking temperature and timing provided are what works for my oven and should also be regarded as a guide only. Every oven behaves a little differently, so please adjust accordingly for your oven.
Storage
Store the bread in an airtight container or bread bag at room temperature for up to 3 days. For longer storage, slice and freeze. Thaw at room temperature or toast straight from frozen.
Final Thoughts
This Soft Spelt Sourdough Bread is a beautiful balance between wholesome flavor, softness, and natural fermentation. Whether you’re looking to incorporate more ancient grains or simply want a naturally leavened bread with a softer bite, this recipe checks all the boxes.
Let me know in the comments if you’ve tried it or you have any questions, and don’t forget to tag @bakewithpaws on Instagram if you share your loaf!
Labels:
Breads (Sourdough) - Soft Loaves,
Great bread! Will try this soon. What does the ***(2.6% rye flour and 30% bread flour)*** stand for?
ReplyDeleteHi there, thank you for your comment. It is the percentage of rye flour and bread flour for the levain. Just for your information.
DeleteCheers :)
Hi... How do I reapportion the recipe to fit a 450g pan instead? I don't have a 600g pan :(
ReplyDeleteHi, thank you for asking. Please reduce all the ingredients to 75% to fit 450g loaf pan. X 0.75
DeleteCheers :)
I tried this recipe using 100% organic spelt flour and reduced the ingredients by 25% to fit 450g loaf pan. The dough was heavy and tight after kneading by bread machine. After 7 hrs only rose to 70% of pan. The final result was a short loaf, not very soft but taste okay. I have a feeling the dough was dry and didn’t attempt to add more water to make it more extensible. Any advice?
ReplyDeleteHi, Thanks for trying this recipe and your feedback. May I know what flour did you feed your starter? I used unbleached bread flour to feed the starter. So, my is not 100% spelt flour.
DeleteIt could be the flour. Bread made from 100% spelt flour is abit dried. You need more water if you feel your dough is dry.
Cheers :)
My regular feeding for starter is unbleached bread flour and 10% rye. Main dough for this recipe I follow 100% spelt. The only change was low fat milk instead of full cream.
DeleteMaybe your spelt flour absorb more water. In this case, you may want to add more water.
DeleteCheers :)
Will try to make some adjustments. Thanks.
DeleteMost welcome :)
Deletehi..jie, before thank you, i want to ask if i want part breadcrumbs and part spelled, how do they comparet, thanks you jie
ReplyDeleteHi, thanks for asking. Are you referring to half bread flour and half spelt flour?
DeleteIf you want to be exactly 50% bread flour and 50% spelt flour then it should be 240g spelt flour and 110g bread flour in the main dough.
Cheers :)
thank you very much jie, I hope and will be waiting for the pannetone recipe from jie , thanks you
ReplyDeleteHi, You are most welcome. Thanks for reading this recipe.
DeleteI still have not venture into Pannetone bread yet. Hope one day when I have the inspiration. Hehehe :)
Cheers :)
Hi, Thanks for posting your recipe. Unfortunately it didn't work for me , it took me back to when I first attempt sour dough bread 3yrs ago and I have come a long way since those early days so this bake was very disappointing. 🤭🤭
ReplyDeleteSorry for late response as I just read your comment. Thank you for trying and sorry that this recipe didn't work for you. May I know what happened?
DeleteThis recipe use about 67% of spelt flour. Please take note not to over knead the dough as spelt flour has a more delicate form of gluten, and over-kneading may lead to breaking down the gluten. It is unlike baking using bread flour.
Different spelt flour also produce different result.
Cheers :)
Hi, do you use wholegrain spelt or white spelt? I like to mix in some wholegrain spelt, can it work with this recipe? Also, if I freeze the bread, can the softness stay longer? Thank you
ReplyDeleteHi, thanks for visiting Bake with Paws. I used white spelt flour. I think should be ok to mix some wholegrain spelt. Maybe the colour and texture will be different.
DeleteA lot of people tried and mentioned the bread stay fresher if store in freezer than in refrigerator. In my family, normally the bread will be finishing in 3 - 4 days time. So, I never freeze my bread before.
Cheers :)
You can try and find out.
Cheers :)
Hi, can I use 100g of wholegrain spelt and 250g of white spelt? Thank you.
ReplyDeleteHi, thanks for asking. I guess should be ok. But, you may need to adjust the liquid quantity as different flour absorb water differently. The texture will be different from the bread I shared above.
DeleteCheers :)
Thanks for your reply.
DeleteI would like know how you calculated the hydration of 67.4%.
Thanks
Hi, Thank you for asking. The 67.4% is the percentage of spelt flour used in this recipe and not the hydration. However, I made an error. The spelt flour percentage used should be 72.91% instead. I have amended on the above recipe.
DeleteCheers :)