
Breads (Sourdough) - Soft Buns/Rolls
Heart-Shaped Sourdough Bagel
February 11, 2022
| Recipe by Bake with Paws
Last Updated on Aug 22, 2025
By Bake with Paws

Heart-Shaped Sourdough Bagels (Yudane Method)
Spread the love this Valentine’s with Heart-Shaped Sourdough Bagels—soft, chewy, and sweet, thanks to the Yudane method. These playful twists on classic bagels are perfect for starting your day with a little more heart. Plus, achieving that distinctive heart shape is easier than you’d expect!
Why You’ll Fall for This Recipe
- The Yudane technique (flour + boiling water) delivers moist, tender texture and keeps your bagels fresh longer.
- Boiling bagels in sweet soda water caramelizes the crust and adds chewiness—bagel perfection in every heart.
- Forming hearts from simple dough strands adds charm and makes breakfast feel extra special.

How To Make Heart Shaped Sourdough Bagel
Ingredients (Yields: 6 Bagels)
Yudane Dough:
80g bread flour (I used Japan High Gluten Flour)
80g boiling water
Main Dough:
250g bread flour (I used Japan High Gluten Flour)
140g active sourdough starter (use at its peak to get better result)
All the yudane dough (above)
15g - 30g brown sugar (I used organic brown sugar)
1 1/2 tsp (8g) salt
85g - 100g water (59% - 61% total hydration) - For the bread flour I used need 100g *
15g vegetable oil (I used extra virgin olive oil)
20g purple sweet potato powder (optional)
* Please reduce water if purple sweet potato powder is omitted.
Boiling/Scalding Water:
1 liter water
2 Tbsp brown sugar or Molasses
1 Tbsp baking soda
Topping:
White sesame seeds
Black sesame seeds
Chia seeds
Utensil:
Baking tray
6 pieces - 4.5" X 4.5" parchment papers
Step-By-Step Method
- Yudane (Prepare 1 day or at least 4 hours in advance): Please click here to see the diagram
- Add bread flour in a bowl, pour the boiling water and mix well with spatula or spoon until no dry flour.
- Cling film and use at least 4 hours later. You can prepare a day before and place in the fridge and Take out from the fridge 30 minutes before using to return to room temperature.
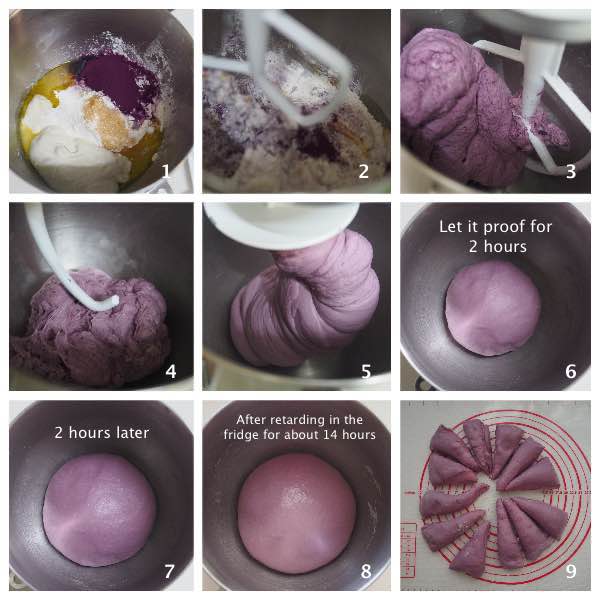
- Main Dough @ Around 6.00 pm:
- Put all ingredients into a bowl of stand mixer.
- Slightly combine the mixture by hand with the paddle attachment before turning on the machine so that the flour will not splash out. Using the paddle attachment, mix for about a minute or until all incorporated.
- Change to hook attachment and knead for about 10 minutes or until the dough comes together and elastic. This is low hydration recipe and the dough is slightly stiff. It is not required to check window pane stage as it is not soft sandwich loaf or buns. The whole kneading process, I stopped few times to scrape down the dough from the hook to be sure it is evenly kneaded and also to prevent the motor from overheating.
- 1st Proofing @ Around 6.30 pm:
- Round up the dough and place back in the same bowl, keep it covered with clingfilm or use a lid. Let the dough proof for about 2 hours on the counter (at room temperature 27C - 28C). The dough rose about 30 - 40% in size.
- Transfer to fridge @ around 8.30 pm and cold retard overnight for 12 - 15 hours.
- Shaping @ Around 10.00 am next day:
- Remove the dough from the fridge and leave on the counter for about 30 minutes to return to room temperature.
- Transfer the dough to a clean floured surface then divide dough into 12 equal portions (approx. 57g each). Please use a kitchen scale if you want to be exact. Form each portion to a ball. Rest for 15 minutes.
- Flatten a dough ball. Roll like a swiss roll. Then roll into a long strand (about 7 inches length)
- Please watch the video "How To Shape Heart Bagel"
- Place each bagel onto parchment paper.
- Final Proofing @ Around 11.30 am:
- I made marks with a pencil about 0.75 cm away from the original size of the bagels. Let them proof at a warm place until the dough rise and reach the pencil marks. It took about 2 hours at 29C - 30C room temperature. The duration of proofing depends on your ambient temperature and starter.
- Boiling/Scalding @ Around 1.30 pm:
- In a sauce pan, combine the water, sugar and baking soda. Bring to boil then turn to low heat. Drop the bagels in and simmer each side for about 30 - 40 seconds. I simmer one bagel at a time. The bagel joints might split when flip the bagel.
- Remove the bagel with strainer ladle and place back onto the parchment paper. Pinch to seal back the joint if it splits during scalding. Immediately sprinkle with seeds mixture. Lightly press the seeds on the bagels. Lift up slightly to sprinkle along the edges.
- Arrange and place into a tray.
- Baking:
- Preheat oven at 220C (top & bottom heat) or 200C (fan-forced) for 15 minutes.
- Bake in a preheated oven for about 18 - 20 minutes, or until golden brown.
- Remove bagel from oven and let them cool on rack.


Expert Tips
- Sourdough Starter:
- A healthy starter is essential for successful bread baking. To ensure your bread rises well, it's important to feed your starter regularly and use it (the levain) at its peak. A consistently fed starter will be more active and reliable. If the mother starter isn’t strong, the dough may still struggle to rise properly, even if the levain is used at its peak. For more information, click the links: "How To Make Sourdough Starter" and "Sourdough Maintenance".
- Gluten Development:
- Essential for soft, airy bread, gluten is created when flour hydrates. To develop it, use techniques like autolyse or kneading. The windowpane test checks readiness—dough should stretch thin without tearing. From my experience, high hydration dough with high percentage of fat will be easy to stretch and achieve a paper thin windowpane stage.
- Kneading:
- Please regard the timing provided as an indication only. It is only meant as a guide. Times vary by flour and mixer type. For higher fat dough, knead longer (18–20 minutes).
- Flour & Hydration:
- Use high-gluten flour for optimal texture. Always reserve some liquid to adjust dough consistency for best results. If dough is too dry, add the reserve liquid one tablespoon at a time until the right consistency.
- Dough Temperature:
- Maintaining the right dough temperature during kneading is crucial for a fine crumb. If the dough becomes too warm, the crumb will become too big and uneven. To prevent this, use cold water, milk, or eggs, and chill your mixing bowl or hook attachment in the freezer. Knead at low speeds, and if your kitchen is warm, rest the dough in a cooler spot. Proper dough temperature ensures a soft, fluffy bread with a fine, even crumb.
- Proofing:
- Proofing time depends on your environment. Use the finger poke test to gauge readiness. To check dough readiness, lightly press the side with your finger:
- If it bounces back instantly, it’s under-proofed and needs more time.
- If the indentation stays, it’s over-proofed.
- If the indentation slowly bounces back, it’s ready to bake.
- There’s also a final rise called oven spring when the dough bakes, which adds to the bread’s height.
- Wrinkle Top or Shrinking:
- If your bread collapses or develops wrinkles on top after baking, it might be over-proofed during the second rise. Aim for the dough to rise to 80-90% of its final size or just below the rim of the pan to prevent this. Over-proofing leads to weaker structure, causing the bread to lose shape.
- Baking & Oven Temperarate:
- Do also note that the baking temperature and timing provided are what works for my oven and should also be regarded as a guide only. Every oven behaves a little differently, so please adjust accordingly for your oven.
FAQ
Can I substitute the Yudane method with another technique?
Yes! You can try tangzhong for a different crumb, but Yudane gives the softest, chewiest result.
How can I reduce sourness?
To reduce sourness in sourdough, always work with a healthy, active starter that has been fed regularly and is at its peak.
Can I bake fresh without retard?
Certainly! Just proof longer at room temperature until fully risen—omit refrigeration if short on time.
Serving & Storage
Best enjoyed fresh or slightly warmed. Store in an airtight container up to 2 days at room temperature. Freeze for up to 1 month—toast lightly before serving to revive texture.
Stay Connected!
Don’t miss out on new recipes—subscribe to Bake with Paws via the pop-up box on this page.
If you try this recipe, I’d love to see your bakes!
Tag me on Instagram @Bakewithpaws so I can share your creation.
And if you have any questions or feedback, please leave a comment below—I’m always happy to help.
Labels:
Breads (Sourdough) - Soft Buns/Rolls,
Comments
Post a Comment