
Easy Shokupan (Japanese Milk Bread) – Ultra Soft, Fluffy & Beginner-Friendly

Easy Shokupan (Japanese Milk Bread)
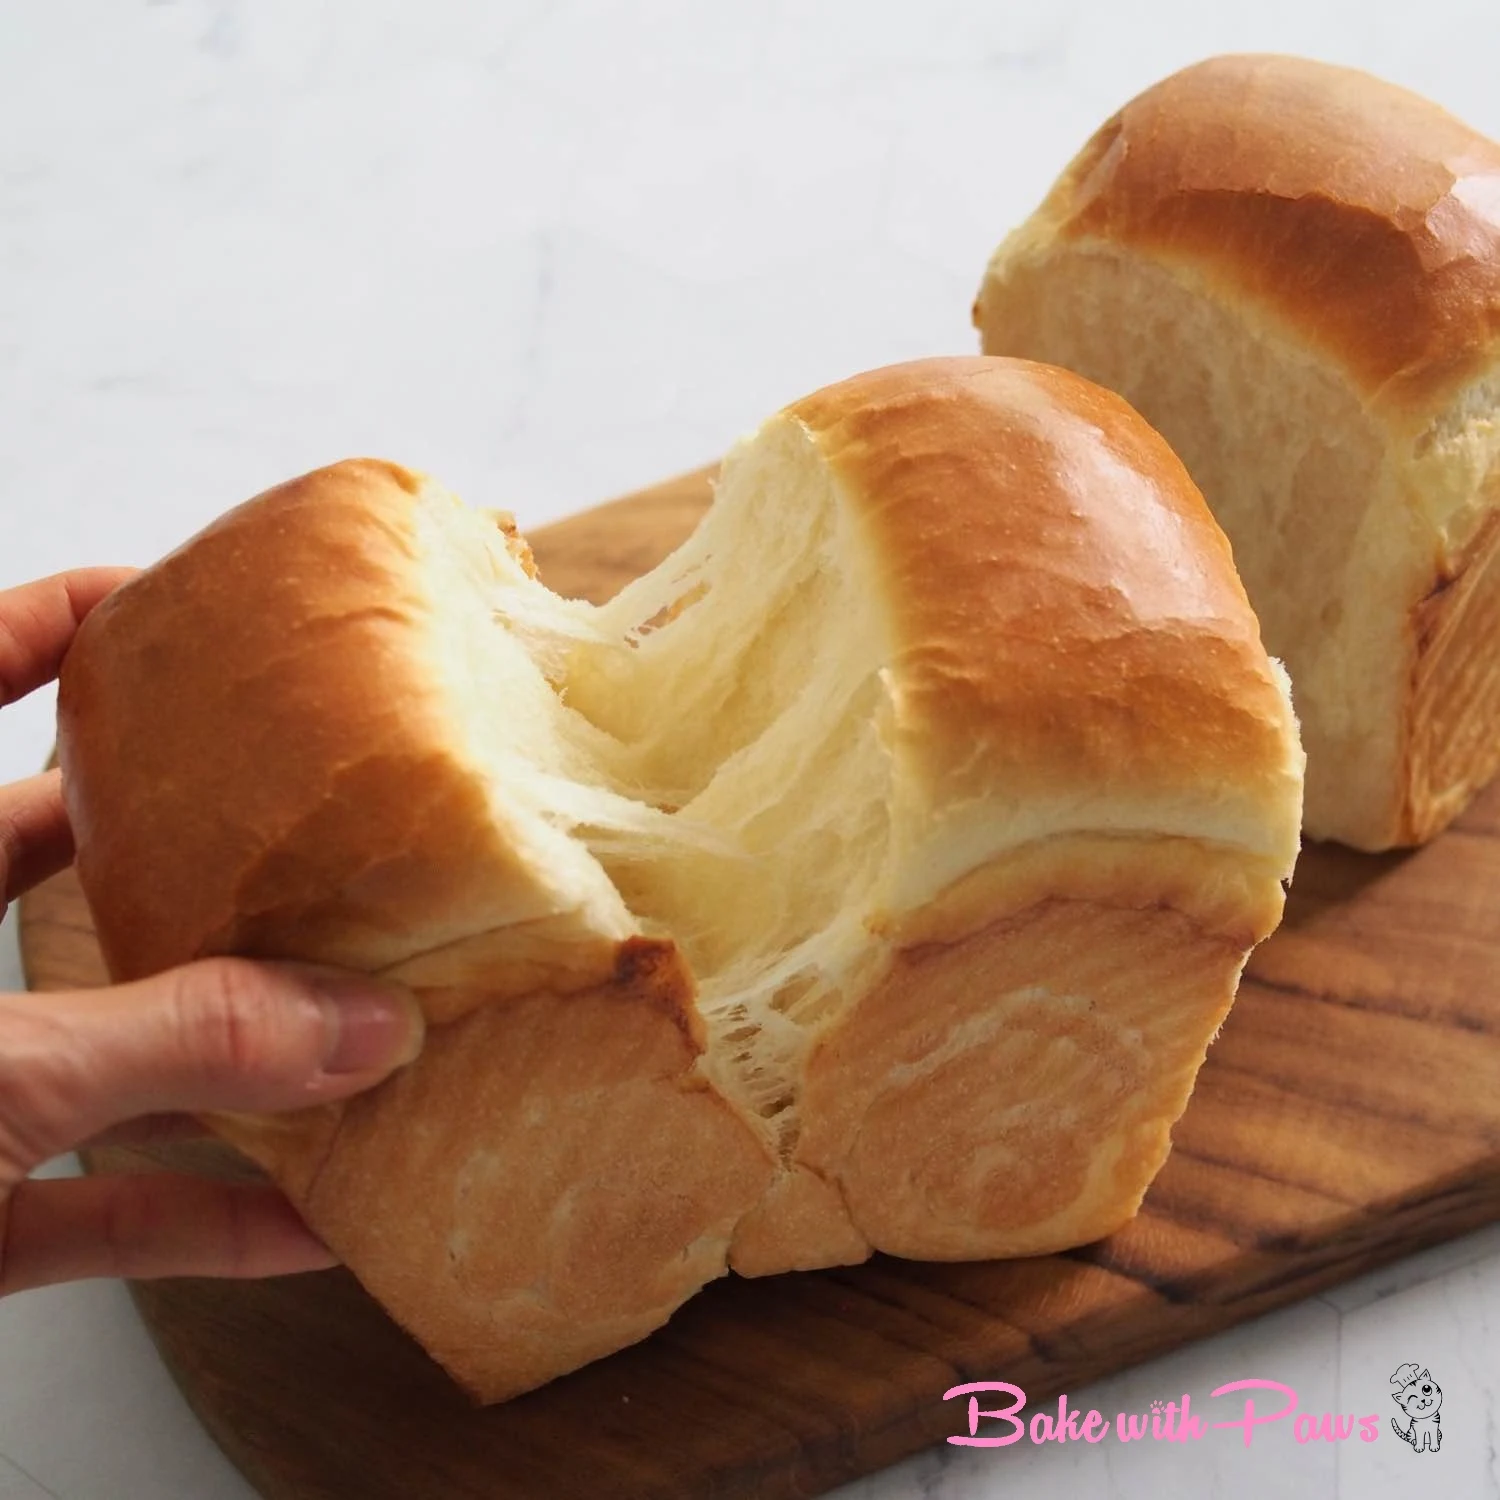
What Makes Shokupan Special?
Unlike regular sandwich bread, Shokupan stands out with:
-
Incredible Softness: It practically melts in your mouth.
-
Tight, Fine Crumb: Perfect for slicing and toasting.
-
Mild Sweetness: Balanced and versatile, great for both sweet and savory fillings.
-
Milky Aroma: Thanks to the use of milk or milk powder, Shokupan smells heavenly right out of the oven.
Why You’ll Love This Easy Recipe
-
✅ No Tangzhong or Yudane Needed
This version skips the roux methods and still yields super soft bread — ideal for quick, no-fuss baking days. -
✅ Beginner-Friendly Method
No overnight retardation, no fancy techniques — just straightforward mixing, kneading, proofing, and baking. -
✅ Everyday Ingredients
You likely already have everything you need in your pantry. -
✅ Versatile & Freezable
Use this loaf for sandwiches, toast, or enjoy it warm with butter and jam. You can also freeze slices for later!
How To Make Easy Shokupan
Ingredients (Yields: 1 Loaf)
Step-By-Step Instructions
- Kneading:
- Put all ingredients (except butter) into a bowl of stand mixer.
- Slightly combine the mixture by hand with the hook attachment before turning on the machine so that the flour will not splash out.
- Knead for another 3 minutes or until the dough comes together. Add in butter and continue knead for 10 - 12 minutes or until the dough come together. But, the dough is not very silky and smooth. You also do not need to achieve window pane stage because the long overnight retard in the fridge will allow adequate gluten development. The whole kneading process, I stopped few times to scrape down the dough from the hook to be sure it is evenly kneaded and also to prevent the motor from overheating.
- 1st Proofing:
- Cover the bowl and transfer dough to the fridge to retard overnight for about 8 – 12 hours. I retarded in the fridge for 10 hours.
- You may also do the same day bake - Let the dough rise in a warm place for 45 - 60 minutes until double in size. But, the result is not as good as long retard in the fridge. I usually left the dough in the same mixing bowl and cover with cling film.
- Shaping:
- Take out dough from the fridge and leave on counter for around 15 mins to soften and relax the dough. Punch down the dough to release the air. Transfer the dough to a clean floured surface then divide into 3 equal portions. Please use a kitchen scale if you want to be exact.
- Form each portion to a ball. Rest for 15 minutes.
- Flatten with rolling pin into a dish.
- Fold right to centre and fold left to meet in the centre. Roll out with rolling pin into long rectangle shape. Roll up the dough like Swiss Roll until a small log is formed.
- Place all dough in a lined loaf pan.
- Final Proofing:
- Let it rise at warm place (my room temperature around 30C) for another 45 - 90 minutes, until dough rises slightly below the rim of the pan.
- Baking:
- Preheat oven at 190C (top & bottom heat) 170C (fan-forced) for 10 - 15 minutes.
- Brush with egg wash (optional)
- Bake in a preheated oven for about 30 minutes, or until golden brown.
- Remove bread from oven and pan, let it cool on rack completely before slicing.


Must-Know Tips Before You Start
- Kneading:
- Please regard the timing provided as an indication only. It is only meant as a guide. Times vary by flour and mixer type. For higher fat dough, knead longer (18–20 minutes).
- Flour & Hydration:
- Use high-gluten flour for optimal texture. Always reserve some liquid to adjust dough consistency for best results. If dough is too dry, add the reserve liquid one tablespoon at a time until the right consistency.
- Dough Temperature:
- Maintaining the right dough temperature during kneading is crucial for a fine crumb. If the dough becomes too warm, the crumb will become too big and uneven. To prevent this, use cold water, milk, or eggs, and chill your mixing bowl or hook attachment in the freezer. Knead at low speeds, and if your kitchen is warm, rest the dough in a cooler spot. Proper dough temperature ensures a soft, fluffy bread with a fine, even crumb.
- Proofing:
- Proofing time depends on your environment. Use the finger poke test to gauge readiness. To check dough readiness, lightly press the side with your finger:
- If it bounces back instantly, it’s under-proofed and needs more time.
- If the indentation stays, it’s over-proofed.
- If the indentation slowly bounces back, it’s ready to bake.
- There’s also a final rise called oven spring when the dough bakes, which adds to the bread’s height.
- Wrinkle Top or Shrinking:
- If your bread collapses or develops wrinkles on top after baking, it might be over-proofed during the second rise. Aim for the dough to rise to 80-90% of its final size or just below the rim of the pan to prevent this. Over-proofing leads to weaker structure, causing the bread to lose shape.
- Baking & Oven Temperarate:
- Do also note that the baking temperature and timing provided are what works for my oven and should also be regarded as a guide only. Every oven behaves a little differently, so please adjust accordingly for your oven.
How to Store
-
Room Temp: Store in an airtight container or bag for up to 3 days.
-
Freezer: Slice and freeze for up to 1 month. Toast from frozen or thaw at room temp.
How to Enjoy Shokupan
-
Classic toast with butter and jam
-
Japanese fruit sando (with whipped cream & fruit)
-
Egg salad or tamago sando
-
Grilled cheese sandwiches
-
French toast with maple syrup
Final Thoughts
Questions or Feedback?
Have questions about this recipe? Let me know in the comments below — I’m happy to help!
Tried this Easy Shokupan? I’d love to see your bakes! Tag me on Instagram @bakewithpaws and use #bakewithpaws so I can feature your beautiful loaves.
Subscribe to Bake with Paws
-
New and tested bread recipes
-
Easy cakes and pastries
-
Baking tips, techniques, and kitchen insights
-
Blog updates straight to your inbox
More Recipes to Try
-
Soft Sourdough Shokupan (with Yudane)
Naturally leavened version with a rich, soft crumb and better shelf life. -
Japanese Soft White Buns
Light and fluffy rolls that are perfect for sliders or breakfast. -
Hokkaido Milk Loaf
Classic pullman-style bread with buttery aroma and cloud-like softness.
Hi Bake with Paw,
ReplyDeleteI appreciate all your sharing. I intend to start baking Sourdough bread and also I love to use the sourdough discard into crackers. But, I don't know how to start to do the starter. Also get confused when read about different level of hydration. Can you pls guide me to do the starter? How many days then I am able to use it? Thank you very much in advance
Hi May, Thanks for visiting this blog.
DeleteWe usually start cultivation from scratch with 100% hydration sourdough starter. It means 1 part of flour and 1 part of water.
Please read this post "How I cultivate Sourdough starter using fruit yeast water"
https://www.bakewithpaws.com/2021/12/how-to-make-sourdough-starter.html
There are many method using water too. You can google search and there are alot.
Please search for How to cultivate sourdough starter from scratch in Youtube by Full Proof Baking. This video is very clear and detailed.
Cheers :)
Hi! Thank you for your beautiful recipes! I never baked a shokupan and I would like to start with this easy one. Is it possible to do it with sourdough? I have a liquid sourdough that I normally use to make bread.
ReplyDeleteHi, thanks for reading this recipe. I have 2 sourdough shokupan recipes in my blog. One using liquid starter and another one using sweet stiff starter. You can search in my blog via search button or Recipes menu on top bar. Or you can use the below links.
DeleteI find the one using sweet stiff starter is better.
Liquid Starter: https:
//www.bakewithpaws.com/2019/05/soft-sourdough-bread-with-yudane-method.html
Sweet Stiff Starter:
https://www.bakewithpaws.com/2021/03/sourdough-shokupan.html
Cheers :)
Hi..thanks for the recipe, can I keep the dough in freeze more then 12 hours? I love to bake not in evening 😀
ReplyDeleteHi, You are most welcome. I have not tried retard in the freezer. Hence, I am not sure it will work. Maybe it will. You should try. However, you can prepare the dough at night before you go to bed and bake the next day morning or afternoon.
DeleteCheers :)
Hi , I don’t own a high powered mixer n been kneading dough in bm. Would it b the same 15 minutes of kneading in bm as well?
ReplyDeleteThanks!
Hi, thanks for reading this recipe. I don't use bread maker and not sure how it works. I would advise you to just follow the duration that you knead other bread. The long retard in the fridge will allow the gluten to be developed.
DeleteCheers :)
Hi YL, thank you so much for your recipes! I’ve tried your other Shokupan and other recipes and love all of them. I was so excited when I saw you post another shokupan recipe and was waiting all week to try it. I made 2 loaves, plus two lots of your potato burger buns, all in one day yesterday! Thanks to you, my family can enjoy nice bread everyday:) My son especially appreciates the soft bread since he just got braces 😁
ReplyDeleteHi, It is my pleasure to share. Thanks for trying and sharing with me the feedback. I am so happy to hear that you like the recipes. You made my day :)
DeleteHappy baking and have a wonderful day :)
Cheers
Hi, is the quality of this Shokupan better than the Tangzhong method?
ReplyDeleteHi, thanks for reading this recipe. My family love both recipe and they can't really tell the different. But, for me I know that this recipe uses more fat. Due to overnight long fermentation the texture is more fine for this bread.
DeleteTo me both are equally good.
Cheers :)
Hi! So for this overnight 1st proofing shokupan, we should be using recipes that has yudane or tangzhong?
ReplyDeleteHi, thanks for visiting Bake with Paws. If you are using yudane method as in my blog then no need to overnight proofing in the fridge. However, you still can do long retarding in the fridge. The purpose of long proofing in the fridge is to make the texture soft, cottony, moist and better self life.
DeleteCheers :)
Hi YL, thank you so much for your recipes! I’ve tried your other Shokupan and other recipes and love all of them. I was so excited when I saw you post another shokupan recipe and https://icedetective.com/best-beer-fridge-uk/ was waiting all week to try it. I made 2 loaves, plus two lots of your potato burger buns, all in one day yesterday! Thanks to you, my family can enjoy nice bread everyday:) My son especially appreciates the soft bread since he just got braces 😁
ReplyDeleteHi there, Thanks for trying my recipes and your kind feedback. Happy to hear that you and your son love them.
DeleteCheers and happy baking :)
Hi!! i‘ve been following your bread recipes on IG., i want to try this one soon. but.. just 1 question..
ReplyDeleteafter overnight proofing do you work on the dough to shape it? or you wait till it comes to Room temperature.?
would really love to prep the dough the night .! so thank you for publishing this recipe!
Hi, thank you for following me in instagram. Sometimes, I rest for 15-30 mins to soften and relax the dough and sometimes I divided immediately once out from the fridge when I run out of time.
DeleteCheers :)
Hi, what if I retard the dough in fridge for more than 12hours? Say 16-18 hrs in view of my schedule ? Will it affect the dough ?
ReplyDeleteHi, Thanks for your interest in this recipe. I think should be ok. However, I never tried more than 12 hours. You can try and see what is the result.
DeleteCheers :)
Could you post which loaf pan you're using? I can't find one with those dimensions. Thank you!
ReplyDeleteHi, thanks for your interest in this recipe. It is above METHOD on the above post.
DeleteUtensils:
450g loaf pan (21.3 X 12.2 X 11.5 cm / 8.4" X 4.8" X 4.5")
Cheers and happy baking :)
Thank you for replying! I understood that those were the dimensions, I just can't seem to find a pan with those dimensions! I thought you might be able to say what brand of loaf pan it is?
DeleteOIC.. Sorry mistaken. It is Chefmade 450g Non-stick Loaf pan.
DeletePlease check on this link:
https://shopee.com.my/amp/Bread-Loaf-Pan%E5%AD%A6%E5%8E%A8-CHEFMADE-450g-300g-250g-Non-Stick-Bread-Loaf-Tin-(Stripes-Flat-Surface-Design)-i.2690195.10722336602
Cheers :)
Can I exclude the sugar from this recipe?
ReplyDeleteHi, you can but the bread going to taste different. You can replace with honey.
DeleteSugar enhances bread flavor, gives the crust a golden color; improves the crumb texture; and helps retain moisture in bread.
Cheers :)
Hi.. sorry for a very late comment. If I want to make this recipe in a 450g loaf pan-same size as yours, but with lid on (rectangle shape) how much in percentage should I reduce your recipe for a perfect fit and size? Thank you
ReplyDeleteHi, no worries. This recipe is suitable for rectangle shape bread with lid on too.
DeleteThank you:)
Hi Yean, I made this recipe using 100g of sourdough sweet levain. I followed your method and did an overnight retard (13 hours) which allowed the gluten to develop and the dough was easy to handle for shaping. I did add 45g of egg and minus 45g of water. Added extra ~1-2 tablespoons of flour because my dough was a tad wet. Even after kneading for 12 minutes my dough still looked a tad shaggy but the overnight refrigeration helped. My second rise took ~5 hours in a proofer at 84-85F. Turned out great and was very soft! Thank you for the great recipe. :)
ReplyDeleteHi Anne, Thank you for sharing with me your modification of this recipe. It is good to hear that it turned out great and soft.
DeleteHowever, you can also try my Sourdough Shokupan recipe in my blog. I have both liquid starter/levain and sweet stiff starter recipes.
Cheers and happy baking :)