
Breads (Sourdough) - Soft Loaves
Tiger Print Soft Sourdough Bread
January 22, 2022
| Recipe by Bake with Paws
Last Updated on May 8, 2025
By Bake with Paws

Tiger Print Soft Sourdough Bread (Sweet Stiff Starter + Yudane Method)
If you love soft, fluffy sourdough bread with a stunning design, you’ll adore this Tiger Print Soft Sourdough Bread! This loaf is not only eye-catching but also incredibly soft and moist, thanks to the Yudane method and sweet stiff starter. Whether you’re making it for a special occasion or as a fun weekend bake, this bread will impress both in looks and flavor.
What is Tiger Print Soft Sourdough Bread?
Tiger Print Soft Sourdough Bread is a visually striking loaf featuring swirls of charcoal or cocoa and plain dough that mimic tiger stripes. It’s made with a soft, enriched sourdough base using a sweet stiff starter for mild flavor and the Yudane method for long-lasting softness and moisture.
Why You’ll Love This Recipe
Soft and fluffy texture → Thanks to Yudane and enriched dough.
Beautiful tiger pattern → Wow your family and friends!
Mild, non-sour flavor → Sweet stiff starter keeps the tang low.
Great for any occasion → Perfect as a gift, for brunch, or just to treat yourself.
Key Techniques
Sweet Stiff Starter
A firm sourdough starter fed with sugar, creating a mild, sweet profile and great leavening strength.
Yudane Method
Scalding flour with boiling water to pre-gelatinize starch, improving softness, shelf life, and moisture retention.

How To Make Tiger Print Soft Sourdough Bread
INGREDIENTS (Yields: 1 Loaf)
Sweet Stiff Starter:
56g sourdough starter (100% Hydration), preferably use at its peak
172g bread flour (I used Japan High Gluten Flour)
88g milk or 72g water (I used full cream or whole milk)
28g sugar (I used organic brown sugar)
Main Dough:
130g bread flour (I used Japan High Gluten Flour)
100g mashed pumpkin, (about 200g pumpkin - peeled, cut, steamed and mashed, discard the excess liquid if possible)
100g mashed pumpkin, (about 200g pumpkin - peeled, cut, steamed and mashed, discard the excess liquid if possible)
All the sweet stiff starter
10g light brown sugar (please increase to your liking)
10g light brown sugar (please increase to your liking)
1 tsp salt
40g - 45g egg *
28g butter
2.5g activated charcoal powder
Utensil:
450g loaf pan (21.3 X 12.2 X 11.5 cm / 8.4" X 4.8" X 4.5")
* Depends on your flour, because each flour absorbs liquid and hydrates differently. You may also add 1 teaspoon of milk at a time during kneading if the dough is too dry, when you see that the dough doesn't stick to the bottom at all. We want the dough to clear from the sides of the bowl with only a small part of the bottom sticking to the base of the mixer bowl. You should hear a slapping sound of the dough hitting the sides of the mixer bowl.
STEP-BY-STEP INSTRUCTIONS:
- Sweet Stiff Starter
- In a bowl of stand mixer, dilute starter with milk/water, stir in sugar and add in bread flour. Mix with paddle attachment until well mixed and all come together. It can be done by hand mixing too.
- Cover and let it ferment until tripled. I prepared a night before and leave it in aircond room (approximately 24 - 25C room temperature) overnight until tripled. It took about 8 - 10 hours depending on your starter. It should take around 5 - 6 hours to get triple at room temperature at 28C - 30C.
- However, if you fed your starter with milk, the starter will take a longer time to proof and very much depends on your stater. Mine took about 9 - 10 hours to proof overnight. And the starter did not rise to triple in size compared to feeding with water. It rose about 2.5 in size only.
- Kneading:
- Put all ingredients (except butter) into a bowl of stand mixer. I usually slightly torn the stiff starter dough first.
- Slightly combine the mixture by hand with the paddle attachment before turning on the machine so that the flour will not splash out. Using the paddle attachment, mix for 2 minutes or until all incorporated. This step is critical to prevent an unevenly mixed dough as the stiff starter is rather hard and a dough hook may not be able to mix it well enough.
- Change to hook attachment and knead for another 3 minutes or until the dough comes together. Add in butter and continue knead for 10 minutes or until the dough become smooth, silky and reach window pane stage. During the kneading process, I stopped few times to scrape down the dough from the hook to be sure it is evenly kneaded and also to prevent the motor from overheating.
- Divide the dough into two equal portions.
- Round up the pumpkin dough and let it sit in a bowl, cover with clingfilm.
- Add in charcoal powders into another dough and continue kneading for another minute until the charcoal powder is well incorporated. Round up the dough and keep it covered with a lid.
- 1st Proofing/Resting:
- Let the dough rest for 45 minutes (room temperature around 29C). The dough rose slightly in 45 minutes.
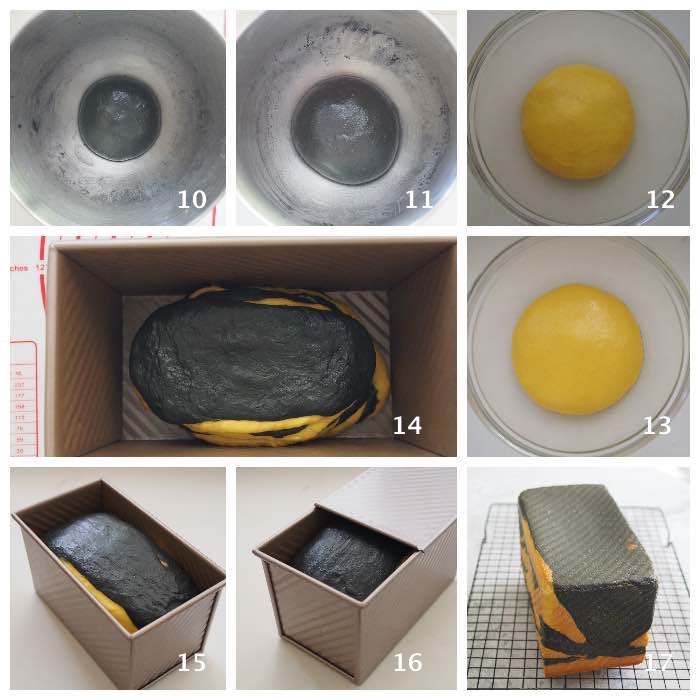
- To shape:
- Transfer the pumpkin dough to a clean and slightly oiled surface then divide into 6 portions randomly. Do not need to be exactly the same size. Form each portion to a ball and let them rest for about 10 minutes.
- Repeat the same for charcoal dough.
- Please watch the video "How To Shape Tiger Print Bread"
- Place all dough in the loaf pan.
- Final Proofing:
- Let it proof in a warm place until the dough reaches 0.5cm - 1 cm below the height of the pan (still be able to slide on the lid). This one took approximately 3 hours at room temperature of 29C - 30C. Put on the lid. The duration of proofing depends on your ambient temperature and starter.
- To bake:
- Bake in a preheated oven at 200C (top & bottom heat) or 180C (fan-forced) for 30 - 35 minutes, or until golden brown. I usually preheat the oven for 15 minutes before baking.
- Remove bread from oven and let them cool on rack completely before slicing.
Sweet Stiff Starter

Main Dough

My Tips for Best Results
- Sourdough Starter:
- A healthy starter is essential for successful bread baking. To ensure your bread rises well, it's important to feed your starter regularly and use it (the levain) at its peak. A consistently fed starter will be more active and reliable. If the mother starter isn’t strong, the dough may still struggle to rise properly, even if the levain is used at its peak. For more information, click the links: "How To Make Sourdough Starter" and "Sourdough Maintenance".
- Gluten Development:
- Essential for soft, airy bread, gluten is created when flour hydrates. To develop it, use techniques like autolyse or kneading. The windowpane test checks readiness—dough should stretch thin without tearing. From my experience, high hydration dough with high percentage of fat will be easy to stretch and achieve a paper thin windowpane stage.
- Kneading:
- Please regard the timing provided as an indication only. It is only meant as a guide. Times vary by flour and mixer type. For higher fat dough, knead longer (18–20 minutes).
- Flour & Hydration:
- Use high-gluten flour for optimal texture. Always reserve some liquid to adjust dough consistency for best results. If dough is too dry, add the reserve liquid one tablespoon at a time until the right consistency.
- Dough Temperature:
- Maintaining the right dough temperature during kneading is crucial for a fine crumb. If the dough becomes too warm, the crumb will become too big and uneven. To prevent this, use cold water, milk, or eggs, and chill your mixing bowl or hook attachment in the freezer. Knead at low speeds, and if your kitchen is warm, rest the dough in a cooler spot. Proper dough temperature ensures a soft, fluffy bread with a fine, even crumb.
- Proofing:
- Proofing time depends on your environment. Use the finger poke test to gauge readiness. To check dough readiness, lightly press the side with your finger:
- If it bounces back instantly, it’s under-proofed and needs more time.
- If the indentation stays, it’s over-proofed.
- If the indentation slowly bounces back, it’s ready to bake.
- There’s also a final rise called oven spring when the dough bakes, which adds to the bread’s height.
- Wrinkle Top or Shrinking:
- If your bread collapses or develops wrinkles on top after baking, it might be over-proofed during the second rise. Aim for the dough to rise to 80-90% of its final size or just below the rim of the pan to prevent this. Over-proofing leads to weaker structure, causing the bread to lose shape.
- Baking & Oven Temperarate:
- Do also note that the baking temperature and timing provided are what works for my oven and should also be regarded as a guide only. Every oven behaves a little differently, so please adjust accordingly for your oven.
Frequently Asked Questions (FAQ)
Q: Can I use active dry yeast instead of a stiff starter?
A: Yes, but the flavor will be less complex, and you’ll need to adjust the recipe.
Q: How do I store this bread?
A: Keep it in an airtight bag at room temperature for 2–3 days, or freeze for longer storage.
Q: Can I skip the Yudane?
A: It’s not recommended; the Yudane is key to the soft, fluffy texture and moisture retention.
Q: Why is my pattern not showing clearly?
A: Ensure you roll and layer the doughs neatly and avoid over-proofing.
How to Serve Tiger Print Soft Sourdough Bread
- Toasted with butter or jam
- As a fun sandwich loaf
- Served plain to showcase its flavor and texture
- As a beautiful gift loaf
Related Recipes You’ll Love
Join My Newsletter for More Tips & Recipes
Subscribe to Bake with Paws to get the latest recipes, baking tips, and updates delivered straight to your inbox!
Final Thoughts
Tiger Print Soft Sourdough Bread is the perfect mix of beauty, flavor, and soft texture. If you’re ready to take your sourdough baking to the next level, this loaf is a must-try. Don’t forget to tag me @Bakewithpaws — I love seeing your beautiful bakes!
Labels:
Breads (Sourdough) - Soft Loaves,
Oh! This is so cool! I have made Tiger cakes before, but I might try to make your bread when I get some charcoal powder. Thank you very much for sharing!
ReplyDeleteHi, thanks for visiting here and your comment. Hope you will like it too. My pleasure to share.
DeleteCheers :)
Thank you so much, YL! I made this today and it turned out perfectly! My daughter loves it!
ReplyDeleteI went online immediately after I read your post and bought activated charcoal for the first time, haha. Have also bought many more bread making tools since I’ve followed your blogs 😄
Hi, thanks for following my blog and posts. Glad to hear that it turned out well and your daughter loves it.
DeleteYou can use the activated charcoal bread to make charcoal soft bread too.
Happy baking and have a wonderful day..
Cheers :)