
Breads (Sourdough) - Soft Buns/Rolls
Christmas Sourdough Fruit Bread – Soft & Festive
November 29, 2022
| Recipe by Bake with Paws
Last Updated on September 4, 2025
By Bake with Paws
")
November signals the start of holiday baking, and this Christmas Fruit Bread is a wonderfully aromatic way to usher in the season. Baked in an adorable star-shaped pan, it’s more than just bread—it’s a festive centerpiece that blends the charm of sourdough with warm holiday flavors. This soft, fruit-studded loaf carries all the cozy aromas you associate with Christmas.
Why You’ll Love This Recipe
- Festive flair — the star-shaped pan looks gorgeous on any holiday table.
- Holiday aroma — fragrant and full of cheer, this scent alone sets the mood.
- Soft, tender texture — the perfect balance of sourdough tang and fruity sweetness.
- Simple but special — straightforward sourdough method elevated with festive fruit for a memorable bake.
")
Scroll to the bottom of the page for "PRINT RECIPE" ⬇
November is coming to an end, December is coming and it is time to get into Christmas baking! I got this cute CHEFMADE Star Shaped Non-Stick Cake Pan recently and instead of baking a cake, I baked this soft and delicious Sourdough Fruit Bread.
This bread smells insanely nice! There is nothing like the sweet aromas of Christmas to get us into a festive mood :)
If you have any questions regarding this recipe or any other post, please leave me a comment in the “LEAVE A COMMENT” link and I will reply you as soon as possible.
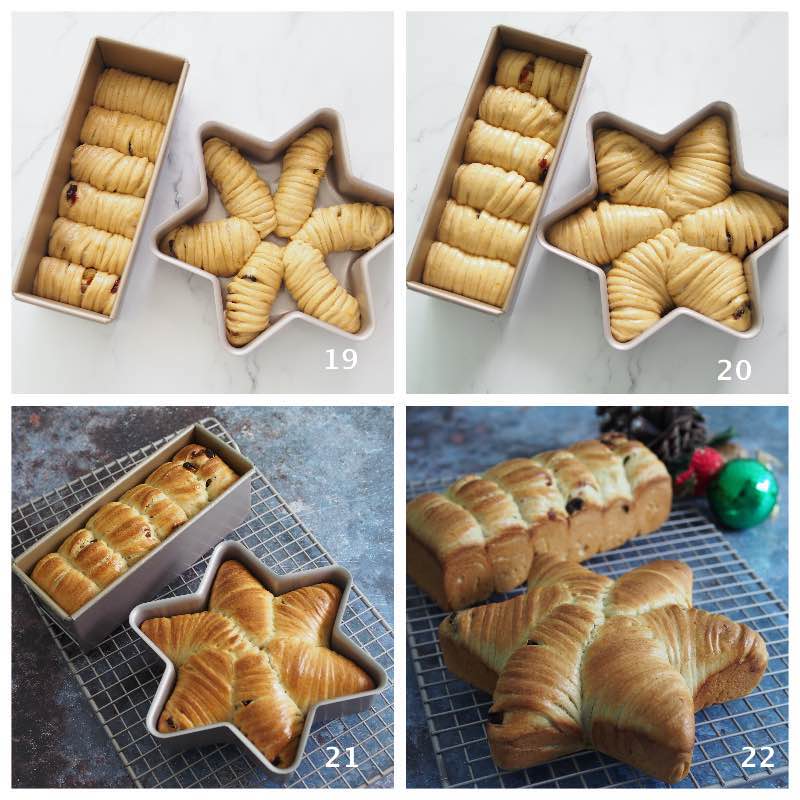
How To Make Christmas Fruit Bread
Ingredients (Yields: 2 bread)
Sweet Stiff Starter (50% Hydration):
60g sourdough starter (100% Hydration), preferably use at its peak
180g bread flour (I used Japan High Gluten Flour)
75g water or 90g milk
30g sugar (I used organic brown sugar)
Main Dough:
140g bread flour (I used Japan High Gluten Flour)
All stiff starter (above)
20g - 25g brown sugar (I used organic brown sugar)
1 salt
20g milk powder (omit this if milk is used in sweet stiff starter)
1/2 tsp mixed spice (Cinnamon, nutmeg, cloves, ginger and coriander)
1/2 tsp ground cinnamon
1 tsp vanilla extract
Zest of 1 orange
100g egg, whisked (from 3 medium egg, balance use for egg wash)
85g butter, room temperature
10g milk
145g dried fruits (cranberry, dark raisins, golden raisins and candied orange peel)
Egg Wash:
Balance of eggs + 1 tsp water
Utensils:
8" CHEFMADE Star Shaped Non-Stick Cake Pan - 1 unit
and
300g non stick loaf pan (22.3 X 8.7 X 7.7 cm / 8.8" X 3.4" X 3") - 1 unit
Step-By-Step Instruction
- Sweet Stiff Starter
- In a bowl of stand mixer, dilute starter with water, stir in sugar and add in bread flour. Mix with paddle attachment until well mixed and all come together.
- Cover and let it ferment until tripled. I prepared a night before and leave it in aircond room (approximately 24 - 25C room temperature) overnight until tripled. It took about 8 - 9 hours depending on your starter. It should take around 4 - 6 hours to get triple at room temperature at 28C - 30C.
- Main Dough:
- Rinse the dried fruits with hot water and let them dry on a kitchen paper towel.
- Put all ingredients (except butter), including all the stiff starter into a bowl of stand mixer.
- Slightly combine the mixture by hand with the paddle attachment before turning on the machine so that the flour will not splash out. Using the paddle attachment, mix for 2 minutes or until all incorporated. This step is critical to prevent an uneven mixed dough as the stiff starter is rather hard and a dough hook may not be able to mix it well enough.
- Change to hook attachment and knead for another 3 minutes or until the dough comes together. Add in butter and continue knead for 13 - 15 minutes or until reach window pane stage. The whole kneading process, I stopped few times to scrape down the dough from the hook to be sure it is evenly kneaded and also to prevent the motor from overheating.
- 1st Proofing/Resting:
- In the same bowl, let the dough rest for 30 - 45 minutes. Keep it covered with clingfilm or use a lid. This dough I rested for 45 minutes and the dough rose quite a lot in 45 minutes.
- Shaping:
- Transfer the dough to a clean floured surface then divide dough into 12 equal portions. Please use a kitchen scale if you want to be exact.
- Form each portion to a ball and rest for 15 minutes.
- Shape one at a time. Please refer to the video and diagram below.
- Place buns onto the pans. 6 buns into one pan. Cover with plastic.
- Final Proofing:
- Let it proof at a warm place until the dough rise double in size. This one took approximately 2.5 hours to 3 hours at room temperature 29 - 30C. The duration of proofing depends on your ambient temperature and starter.
- Baking:
- Preheat oven at 190C (top & bottom heat) or 180C (fan-forced) for 10 - 15 minutes.
- Brush with egg wash.
- Bake in a preheated oven for 18 - 20 minutes, or until golden brown.
- Remove bread from oven and let them cool on rack.
Sweet Stiff Starter

Main Dough


Tips for Perfect Result
- Sourdough Starter:
- A healthy starter is essential for successful bread baking. To ensure your bread rises well, it's important to feed your starter regularly and use it (the levain) at its peak. A consistently fed starter will be more active and reliable. If the mother starter isn’t strong, the dough may still struggle to rise properly, even if the levain is used at its peak. For more information, click the links: "How To Make Sourdough Starter" and "Sourdough Maintenance".
- Gluten Development:
- Essential for soft, airy bread, gluten is created when flour hydrates. To develop it, use techniques like autolyse or kneading. The windowpane test checks readiness—dough should stretch thin without tearing. From my experience, high hydration dough with high percentage of fat will be easy to stretch and achieve a paper thin windowpane stage.
- Kneading:
- Please regard the timing provided as an indication only. It is only meant as a guide. Times vary by flour and mixer type. For higher fat dough, knead longer (18–20 minutes).
- Flour & Hydration:
- Use high-gluten flour for optimal texture. Always reserve some liquid to adjust dough consistency for best results. If dough is too dry, add the reserve liquid one tablespoon at a time until the right consistency.
- Dough Temperature:
- Maintaining the right dough temperature during kneading is crucial for a fine crumb. If the dough becomes too warm, the crumb will become too big and uneven. To prevent this, use cold water, milk, or eggs, and chill your mixing bowl or hook attachment in the freezer. Knead at low speeds, and if your kitchen is warm, rest the dough in a cooler spot. Proper dough temperature ensures a soft, fluffy bread with a fine, even crumb.
- Proofing:
- Proofing time depends on your environment. Use the finger poke test to gauge readiness. To check dough readiness, lightly press the side with your finger:
- If it bounces back instantly, it’s under-proofed and needs more time.
- If the indentation stays, it’s over-proofed.
- If the indentation slowly bounces back, it’s ready to bake.
- There’s also a final rise called oven spring when the dough bakes, which adds to the bread’s height.
- Wrinkle Top or Shrinking:
- If your bread collapses or develops wrinkles on top after baking, it might be over-proofed during the second rise. Aim for the dough to rise to 80-90% of its final size or just below the rim of the pan to prevent this. Over-proofing leads to weaker structure, causing the bread to lose shape.
- Baking & Oven Temperarate:
- Do also note that the baking temperature and timing provided are what works for my oven and should also be regarded as a guide only. Every oven behaves a little differently, so please adjust accordingly for your oven.
FAQs about Christmas Sourdough Fruit Bread
Q: Can I use a loaf pan instead of a star pan?
Yes! A loaf pan works fine—but if you want to wow your guests, the star-shaped pan really elevates the visual.
Q: Do I need to soak the dried fruit?
It’s a good idea. It helps the fruit remain juicy and prevents it from absorbing dough hydration.
Q: What fruits work best?
Raisins, dried cranberries, chopped figs, or candied peels all add festive flavor.
Q: How long does this stay fresh?
Thanks to the sourdough’s natural fermentation, the loaf remains soft and flavorful for several days.
Other Festive Baking Recipes You Might Love
Sourdough Hot Cross Buns – perfect during Easter or anytime you crave spiced sweetness
Rosemary Brioche Buns - Soft and Buttery
Moist Fruit Cake - Moist and Aromatic
Crispy Almond Biscotti - Crispy and Addictive
Subscribe Bake With Paws – Subscribe at Pop-Up Box
Loving the holiday vibes? Subscribe via the pop-up box to get festive recipes, exclusive tips, and seasonal baking inspiration delivered right to your inbox.
Have a Question or Tried This Recipe?
I’d love to hear from you! Drop a comment below, share your festive photos, or tag @bakewithpaws on Instagram. Here’s to a season filled with warm ovens, joyful baking, and delicious slices of holiday spirit!
Labels:
Breads (Sourdough) - Soft Buns/Rolls,
Hi, do u have non-sourdough version of recipe of this bread? Thanks!
ReplyDeleteHi, Thanks for your interest in this recipe. Please use Brioche recipe using instant yeast in my blog to bake this bread. Just added the spice and dried fruit that you like.
DeleteBiroche Recipe Link:
https://www.bakewithpaws.com/2019/04/brioche.html
You may use 350g or 400g Flour recipe as you like. You will end up with taller bread if you use 400g flour recipe.
Cheers and happy baking :)
Hello! Thank you for this beautiful recipe. Sorry for my delayed question. Am thinking of making it tomorrow 😄 What is the purpose of rinsing the dried fruits? Is it just hygiene or some other chemical reasons that may affect the rising of the bread? BlueWren
ReplyDeleteHi, thank you for your interest in this recipe. No worry.. The reason I rinsed the dried fruits is because I found there are some trace of wax in it. If you can get organic dried fruits then you can skip this step. Anyway, rising the dried fruits will soften the texture too.
DeleteHappy Baking and Merry Xmas :)
Great, thank you so much for your quick reply and explanation. I followed your advice. Wow! I tried your recipe today, and it is amazing!!! So soft!! So fragrant! Thank you so much for sharing! I will be making this again :) You have a gift for making things easy to follow, so I don’t feel scared to try 😄
DeleteHave a blessed Christmas! BlueWren
You are most welcome.. Thank you for trying and glad to hear that you like it. I hope next recipe will not disappoint you.. lol
DeleteKeep baking and hope to hear from you...
Happy Holiday :)